
HADDOCK2.2 manual
Start a New Project
Using your web browser, go to the HADDOCK home-page, choose HADDOCK online and click on "Start a new project"
First enter some general HADDOCK parameters:
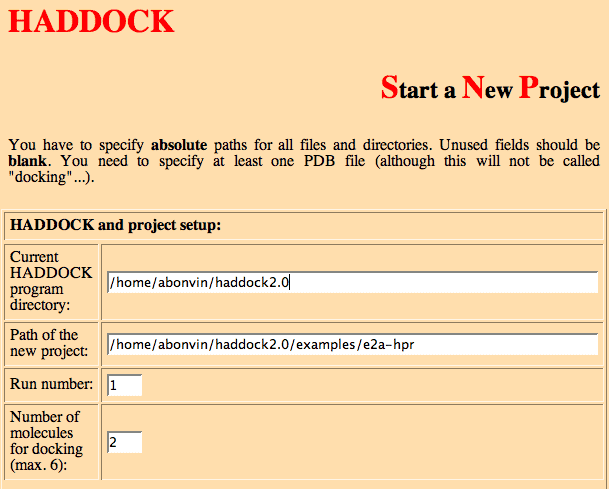
- Enter the location of the directory where HADDOCK has been installed (if needed), e.g.
Current HADDOCK program directory: /software/haddock2.2
Note: When installing HADDOCK customize the location of HADDOCK in the html file start_new.html, see installation.).
Path of the new project: /home/tintin/e2a-hpr
Run number: 1
This is used to keep track of various runs. It can be a number or a string (or even a combination).
Number of molecules for docking (max. 6): 2
Note: You can even specify only one molecule. This will no longer be called docking, but it allows instead to use HADDOCK for refinement purpose.
Next define the PDB files of each molecule:
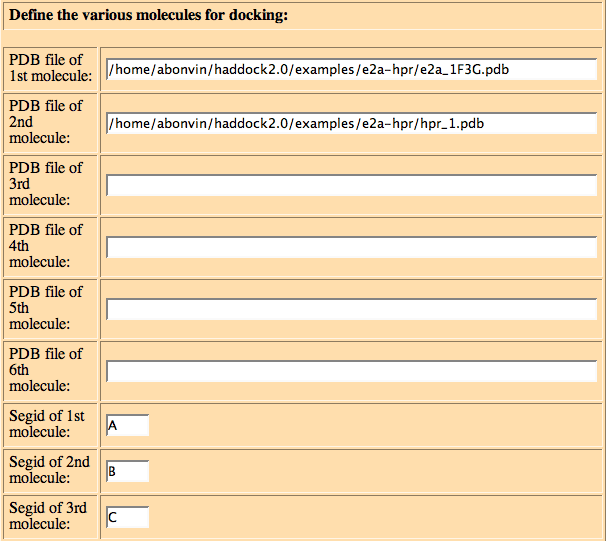
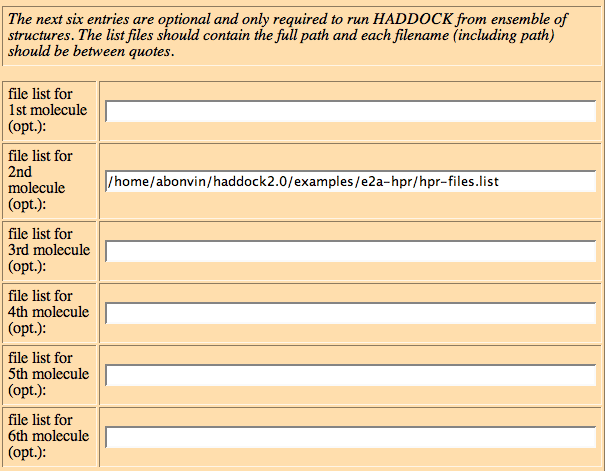
You should provide here the name (including full directory path) of the PDB files of the various molecules, define the SEGIDs used to identify the chains in CNS and, if performing docking from an ensemble of structures, files containing the names including full directory path of the various PDB structures to used for docking
 . Leave the fields unused blank.
   PDB file of 1st molecule:  /home/tintin/e2a-hpr/e2a.pdb
   PDB file of 2nd molecule:  /home/tintin/e2a-hpr/hpr.pdb
   PDB file of 3rd molecule:
   PDB file of 4th molecule:
   PDB file of 5th molecule:
   PDB file of 6th molecule:
   Segid of 1st molecule:  A
   Segid of 2nd molecule:  B
   Segid of 3rd molecule:  C
   Segid of 4th molecule:  D
   Segid of 5th molecule:  E
   Segid of 6th molecule:  F
   file list for 1st molecule:
   file list for 2nd molecule:  /home/tintin/e2a-hpr/hpr_file.list
   file list for 3rd molecule:
   file list for 4th molecule:
   file list for 5th molecule:
   file list for 6th molecule:
In this example, we use an ensemble of starting conformations only for hpr. The list file should contain the name of the various PDBs between double quotes, e.g.:
   "/home/tintin/e2a-hpr/hpr-1hdn_001.pdb"
   "/home/tintin/e2a-hpr/hpr-1hdn_002.pdb"
   "/home/tintin/e2a-hpr/hpr-1hdn_003.pdb"
   "/home/tintin/e2a-hpr/hpr-1hdn_004.pdb"
   "/home/tintin/e2a-hpr/hpr-1hdn_005.pdb"
   ...
Define finally the Ambiguous Interaction Restraints (AIRs) restraints if available, e.g.

AIR restraints: /home/tintin/e2a-hpr/e2a-hpr_air.tbl
Define any other additional (classical NMR) restraints if available, e.g. unambiguous distance restraints, dihedral angle and hydrogen bond restraints to maintain secondary structure for example, RDCs and diffusion anisotropy restraints.
Note: AIRs, unambiguous and hydrogen bond restraints can be turned on and off at various stages during the docking and refinement stage. In that way you can define different type of restraints and assign separate weights to them. In principle there is no difference in the treatment of AIRs and unambiguous restraints, except for the fact that a user-defined fraction of the AIRs can be randomly deleted for each docking trial; unambiguous restraints are not affected by this option.
Save the updated parameters as new.html in the directory defined as "Path of the new project" using the "Save updated parameters" button at the bottom. This file contains all the data as html text in a format which can be read by HADDOCK.
Start HADDOCK in the directory where you saved the new.html file by typing
haddock2.2Make sure that the PYTHONPATH system variable contains the path of the HADDOCK installation (see installation).
HADDOCK will create a directory runX (where X is the run number defined in the new.html file). In this directory, a run.cns file will be created. You will have to edit this file to start the docking (see "the docking" section).
In the runX directory some subdirectories are created containing:
- runX/data/distances/: HADDOCK copied the AIR file into the ambig.tbl file. If you entered some unambiguous distance restraints, HADDOCK will copy them in the unambig.tbl file.
- runX/data/sequence/ : HADDOCK copied the pdb files of the two molecules and the list files for ensembles in this directory.
- runX/data/ensemble-models/ : In case of an ensemble of starting structures, HADDOCK copies all pdb files of the two molecules to this directory.
- runX/data/dani/, runX/data/dihedrals/, runX/data/hbonds/, runX/data/jcouplings/, runX/data/rdc/, runX/data/pcs/ correspond to directories containing diffusion anisotropy, dihedral, hydrogen bond, jcoupling, residual dipolar coupling and pseudo contact shift restraints if defined in the new.html file.
- runX/protocols/ : contains all the CNS scripts for docking and analysis
- runX/tools/ : some scripts used for the analysis of the solutions will be stored in this directory
- runX/toppar/ : this directory contains all the parameters files
- runX/begin/ and runX/structures/ : for a description of these directories, please refer to the "start the docking" section.